DIY Natural Hair Color Toner: Do It Natural, Do It Right!

- What Is Hair Toner?
- DIY Hair Toners Explained
- What Is A Toner Shampoo?
- How Does It Work?
- Toning Shampoo vs. Toning Conditioner
- Brand Name Toning Shampoo vs. DIY Toning Shampoo
- Do It Yourself Toning Shampoo-Conditioner Recipe
- What You'll Need
- How To Make The Shampoo
- How to Use Toning Shampoo-Conditioner
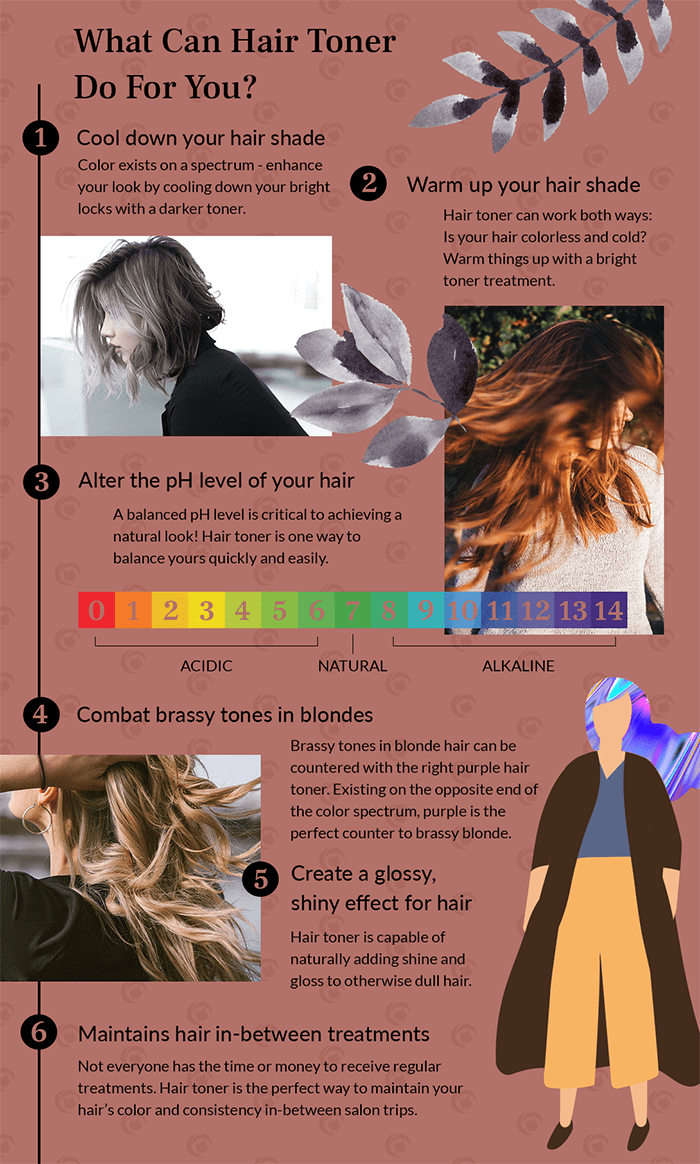
- Maple Holistics Hair Toner Infographic
- Conclusion
Nothing compares to the sleek color of your luxurious locks after a coloring session at the salon, but after a while the bright lustrous undertones can turn brassy and dull prompting you for another trip to the hairdresser. Who knew that you could make your own hair color toner instead?
Brassy undertones are not a blonde-exclusive tribulation, though, despite what many may think. Sure, it may be the most noticeable on blondes (natural or otherwise). But redheads certainly deal with brassiness, as do brunettes of all shades.
Even those with jet-black hair, who may have more subtle dullness going on, can use DIY toning shampoo to get hair as glossy and black as a raven. The “brassy” look does come in and out of fashion but for me, it’s a look I have tried to avoid.

Girl with raven black hair.
With continuous hair regrowth, toning for me is a must. Toning is a final step that is needed to brighten your color-treated hair and banish the unwanted tones. Many name brands mix their toners with various chemicals to help you achieve the result you like, but they can be damaging to your hair, not to mention your pocket.
Luckily, there is an inexpensive safe, non-damaging, method you can use and create at home that will get you a result you are happy with! This is our DIY Different Hair Color Toner.
What Is Hair Toner?
Hair toner is a great tool for light colored hair. Many think that toners are used to get that lighter blonde look, but this actually is just a myth. Most toners are purple or blue, but they usually differ by brand. To use a hair toner correctly, you need to first get your hair to your desired color. Hair toners are really only for lighter hair colors since they remove brassiness and add a little more shine.
The fact that most hair toners are purple is what helps the lighter hair become less brassy. The purple negates the orange or yellow tones you’re trying to get rid of. It helps even out the hair color throughout. Toners are very helpful for dying regulars and someone who recently dyed their hair. They are also great for people with grey hair since it helps make an all over shade instead of just a patchy grey.
DIY Hair Toners Explained
What Is A Toner Shampoo?
Simply put, it is a colored shampoo in various colors that distributes pigment to neutralize and revive brassy and unwanted tones in your hair. You may have heard of the popular Purple Shampoo, which is best utilized by blondes.
How Does It Work?

Color theory.
To understand this concept, we have to know a little color science. When we look at the color wheel below, we can not only see which colors complement each other, but we can also see which colors are the opposite of each other.
Green is directly across from red on the color wheel. So the green color in a green shampoo/conditioner will effectively neutralize all the brassy red tones in your hair. When washing your hair with toner shampoo, the follicles absorb a small amount of pigment, which cancels out the unsightly undertones you’re targeting.
Adjust the DIY mix according to your needs. It basically brightens up your mane by restoring your hair to its former cooler color, but unlike what some people think, it will not dye your hair whatever color you added. This is not a coloring product (though it can cause a slight unintentional hue if you leave the product in too long)!
Using a DIY toning product as occasional aftercare at home is the best thing for in-between color appointments, and it can extend the life of your color. By extending the life of your color, your trips to the salon become less frequent and you can spend that money on other things or save it. Bottom line, it’s just going to really brighten up that color, making it look like you’ve just visited the salon.
Click Here For Great Deals On Hair Color Treatments
Toning Shampoo vs. Toning Conditioner

Maybe a bit too long.
Brand name toning conditioners are more pigmented than toning shampoos, so they work harder to combat those unsightly tones. Due to this, there is the chance of over depositing color, so you really should use them only once a week.
In a DIY set, this isn’t the issue, rather you would use the conditioner if you have more brassiness and need to keep the product in longer (more than say an hour). I don’t recommend using both, certainly not more than once a week. If you over do it, you really can end up with a slight tint of the color you’re using.
Brand Name Toning Shampoo vs. DIY Toning Shampoo
Consider these points when deciding which to use to tone your hair.
1) Price: Brand name pigmented shampoos can be expensive.
2) Adjustments: With DIY mixes, it is easy to change the ratio according to your specific toning needs.
3) Consistency: Brand names are produced to have consistent ratio’s in each bottle, DIY can kind of be up in the air unless you are careful to measure the ingredients.
Do It Yourself Toning Shampoo-Conditioner Recipe
Sometimes you may find yourself in a pinch for a treatment and either don’t have the time or money to get your hair done at a salon. This is an effective recipe and you probably have the ingredients already in your home. You want to mix a pea size drop with shampoo of whatever color is opposite the offending tone in your hair color. This is the same way purple shampoos remove yellow in grey hair or blondes.
Simple Mix Examples
- To neutralize red tone in brunettes mix shampoo with green food coloring.
- To neutralize orange tone mix shampoo with blue food coloring.
- To neutralize red/orange in a brunette mix shampoo with blue/green food coloring.
What You’ll Need
- A Clear or white moisturizing shampoo and conditioner of your choice.
- Quality semi-permanent hair dye or even good food coloring.
- Apple cider vinegar (optional).
- A plastic spoon and a bowl.
- A bottle and funnel.
How To Make The Shampoo
- Pour the shampoo or conditioner in a bowl. You can use half the bottle at first. Add a few drops of the coloring, whether it be food coloring or hair dye. You’ll need to play around with how many drops you need depending on the resulting color.
- After everything is mixed together, use the funnel to help you easily pour the mixture into a bottle for future uses.
- Follow the direction below for how to use it.
How to Use Toning Shampoo-Conditioner

Don’t leave hair toner in for too long.
Please do a strand test before using this treatment. You’ll need to see how it affects your hair’s tones and if you need to adjust the coloring ratio. If after your strand test you find it too strong, you can dilute the mixture and vice-a-versa.
Using the product once a week typically works to help keep brassiness and dullness from developing, especially if you begin a routine of using the toning shampoo a couple of weeks after initially coloring your hair.
If your color-treated hair has already turned brassy or dull, you may need to use the toning shampoo every other day until the brassiness is neutralized and your lush color returns. Frequency really will depend on the level of problematic tones. To actually use the DIY toning product:
- Rinse your hair in hot water before applying, as doing so will cause the hair shaft to expand, allowing for better depositing of the color pigment.
- Use as you would your regular shampoo/conditioner, and apply it to your roots.
- Massage into the roots first and then allow the shampoo through to the ends.
Depending on the color it needs to neutralize, leave it in for anywhere from a few minutes to up to an hour max. If you leave it in for too long your hair may end up retaining some of the color from the shampoo.
- Rinse your hair thoroughly with cold water, which will cause the hair shaft to close, sealing in the color and leaving it smooth and protected.
Roots: Many times this is where we start when applying product. This is the newest, freshest hair so it takes a bit more time for the toner to perform.
Mid-lengths: This hair is a little more porous, it has had time to be exposed to natural and unnatural elements such as sun exposure, coloring, highlighting, and heat styling, so the hair shaft is a bit more open than your roots to receiving color.
Ends/tips: The most porous section of our tresses, our ends have been through the most. They accept color very easily so they don’t need as much time as your roots.
For the Optional Apple Cider Vinegar Rinse
After you shampoo and condition your hair, pour a little vinegar over your strands and massage throughout, then rinse. It will produce a gorgeous shine and gloss to your hair! Your hair will be toned, beautifully shiny, and wonderfully soft!
Maple Holistics Hair Toner Infographic
Conclusion
Making sure that your hair is always looking and feeling its best is a priority for us. So we give you these guidelines (which are the same any professional would give you) to ensure that you look and feel your best all the time for free! Simply because we care about your hair.